This article originally appeared on ScooterDad.com and has been reposted here for posterity.
Installing bearings can be a pain, but a few simple tips can make that process easier.
Once you’ve made the move from plastic core wheels to metal core wheels, you probably know how frustrating it can be to install bearings. The actual act of installing bearings isn’t that hard, but doing it the right way without damaging or distorting them to the point where they don’t function as intended can be difficult. Often, you’ll have to beat the bearings into the wheels because wheel manufacturers don’t have the best production tolerances. Once you start really hammering on the bearings, you’re likely to damage or distort them.
After a couple years of installing bearings, here are a few tips that I’ve learned to help reduce headaches related to this process. You’re going to have to do this often for your kid and his friends, so you better learn how to do it sooner rather than later.
Greased Lightning
In addition to using grease for packing headset bearings, I also like to use a little grease to help ease the friction between bearings and metal core wheels during installation. Just dip your finger in the grease and put a light coating around the inside of the wheel’s core where the outer ring of the bearing will make contact. It doesn’t take much, so don’t over-do it.
I use the same grease on scooters that I use on my motorcycles: Bel Ray Waterproof Grease. It works great and you can find it pretty cheap online or at a local motorcycle shop for less than $10.
Hot and Cold
One trick that Korey Kier of NW Scoot taught me utilizes the physics of heat and cold to give yourself just a little wiggle room when installing bearings. Put your bearings in the freezer for at least 30 minutes. In the mean time, put your wheels in the hottest water you can find. You may need to boil water, although you don’t want to put them in while the water is actually boiling or you might risk melting the urethane. I use the instahot tap on our sink and it works well. After about 10 minutes, I dump the water and add more hot water from the instahot tap.
After 30 minutes of heating and cooling, yank the wheels and the bearings out and quickly assemble them before they return to room temperature. The theory behind this is that the heat expands the wheels just a little bit and the cold contracts the bearings just a little bit. It’s an immeasureable difference, if any, and I’ve had mixed results with this technique, but it’s worth a shot. I like to combine this technique with grease, but you’ve got to be fast before the temperature difference neutralizes.
Captain Caveman
If you still can’t coax your bearings into the wheels, you’re now going to have to resort to some kind of physical force to complete the task. I’ve tried using an allthread rod with some washers and nuts from Home Depot to compress the bearings into the wheels, but this, too, gave me mixed results, often breaking the allthread or jamming the bearings in slightly crooked.
When you resort to the hammer, you’ve got to do it right. First, make sure you’re supporting the wheel on a firm, hard, stable, even surface. You can either place the bearing on the surface and hammer the wheel down on to it or you can hammer the bearing into the wheel. Either way, you’re going to want to use a heavy rubber mallet and you’re going to need something to apply even pressure to all parts of the bearing or wheel, whichever you are striking.
Most often, I’ll put the wheel on the bottom and strike the bearing using a socket from my socket wrench set that is approximately the same diameter as the bearing. Place the closed end of the socket against the bearing so that as much metal as possible is in contact with the bearing, which is designed for vertical (outside to inside) pressure, not lateral (side to side) pressure.
Do it the Right Way
There’s got to be a better way to do this, right? After a few frustrating moments, I’m sure you’re ready to buy whatever tool is the right tool for the job. Well, it turns out that there is a right tool for this job.
Phoenix wheels are fantastic and I highly recommend them since they come pre-loaded with bearings and spacers. A few months ago, I saw a video (see below) showing how they install bearings in their wheels. It turns out that they have some kind of press with a tip that fits a bearing perfectly. When you’re installing thousands of bearings, this makes sense, but for you and I, there’s a “good enough” tool that can be had for less than $30! You can pick up a 1/2 Ton Arbor Press from Harbor Freight for $27.99 when it’s on sale and you can often find a 20% off coupon in their ads. After a year or so of installing bearings, you’ll be more than ready to drop $30 on a tool to speed up the process and make it easier.
Don’t Forget
Some bearings have an inside and an outside. That is, one side is shielded more than the other side. This is the case for Bones Reds bearings, so I always make sure that the red shield is facing out from the inner part of the wheel.
Speaking of Bones Reds, they are my preferred bearing. They are the most commonly found bearings at skate shops around town, they are reasonably priced (if you pay more than $16 for a box of 8, you’re getting ripped off), and they work about as well as the more expensive bearings I’ve tried. Some people will try to tell you that $80 ceramic/titanium bearings are the way to go. My opinion is that you’re better off getting Bones Reds for $16, get 4 wheels out of a box, and then replace them every time you replace your wheels. Bearings sustain enough damage from dirt, installation, and removal that I don’t think it’s worth it to buy expensive bearings and try to reuse them.
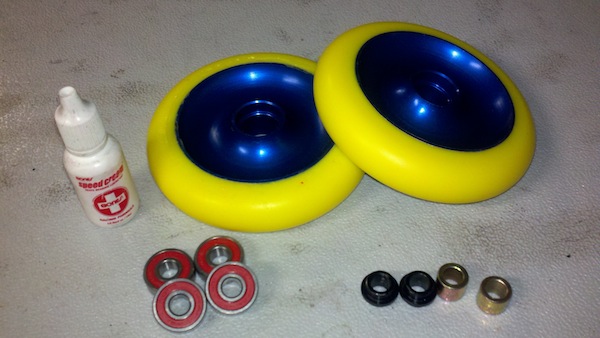
Before you install your bearings, make sure that you have bearing spacers. These are a very important part of ensuring that your bearings function properly. They act as a an internal support between the bearings so that lateral pressure from the axle being tightened down is opposed and neutralized by the bearing spacer pressing out. Be aware that some wheels, such as Eagle wheels, require a specific type of spacer. For my money, I like the heavy duty spacers from Inward Scooters, although their standard bearing spacers work well too.
Lastly, don’t forget to throw a couple drops of Bones Speed Cream on your bearings to ensure that they are properly lubricated. This will ensure that you get the maximum performance possible from your bearings, if you’ve installed them properly.
If you have any tips or tricks for installing bearings that you’d like to share, I’d love to hear them. Please leave a comment below.
Thanks and good luck!
Update July 22nd, 2011:
I just ran across this video of Nick Darger from Scooter Zone showing a method to install bearings that uses an axle and old bearings. This would be a great method when you’re at the park or at a comp. This method is very similar to what I mentioned above about using an allthread rod, a couple washers, and some bolts.
In addition, at the end of the video, it shows the same arbor press I have and how they use it to install bearings.