This article originally appeared on ScooterDad.com and has been reposted here for posterity.
Removing flat spots from scooter wheels can save you money, but it can also be dangerous. Always be extremely careful when operating power tools.
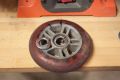
If you’ve ever bought expensive wheels for your kid, you know how frustrating it can be for both you and your kid when he develops a flat spot on the wheel. This can be frustrating even if the wheels were relatively inexpensive. While wheels are a consumable part of a scooter, that doesn’t mean that you should have to burn through them like a tank of gas in your car. The more expensive wheels are typically made from a better quality compound so they last longer, but they, too, can experience flat spots, uneven wear, or chunking.
As your scooter kid’s talent and the parts on his scooter improve, flat spots become less of a worry. Sadly, however, the most common cause of flat spots that we experience today are from non-scooter kids that get a hold of Paxton’s scooter. They don’t understand that locking up the brake and skidding the scooter will ruin the wheels. This is one reason that we tell our scooter kid to only let people that he trusts ride his scooter.
Another tip for avoiding flat spots is to switch your kid to a Phoenix Pro Scooters Switchblade or similar style brake. These brakes are lighter, they don’t require a spring, they are easier to install, they don’t rattle, and they don’t lock up the wheel the same way most spring brakes do causing the wheel to skid.
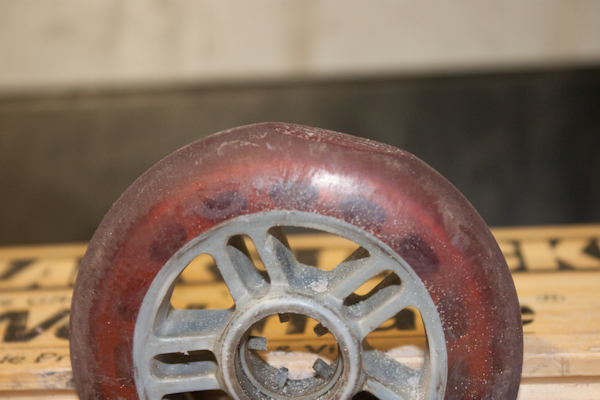
Even with all precautions taken, you’re still going to end up with the occasional premature wheel surface damage. Rather than throw the wheel in the garbage and spend more money on new wheels, if they have some life left in them, why not resurface them? It seems like a daunting process, but with the right tools and a little planning, you can do it quickly and easily.
WARNING
The following instructions describe a potentially dangerous procedure and should not be performed by children or anyone not comfortable with power tools. If you are a kid, have a parent do this for you. Improper use of power tools could result in severe injury. Always follow tool instructions and wear safety equipment.
Please read all of these instructions and watch the video before attempting this technique.
What You Need
In order to resurface your wheels, you’re going to need a few things. If you don’t already have these or you can’t find someone who will let you borrow theirs, you’ll need to purchase them:
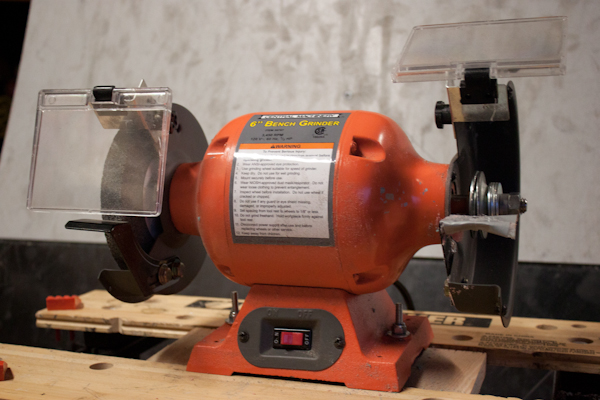
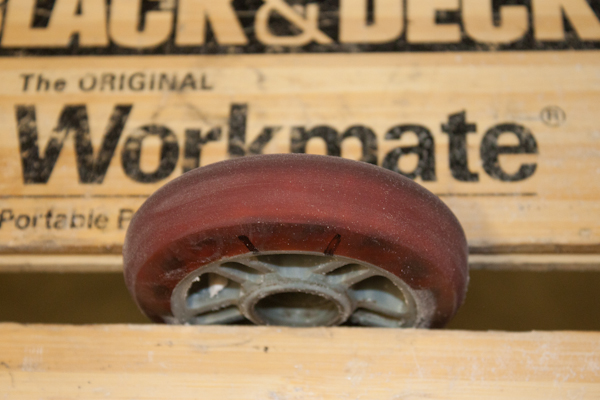
Bench grinder: if you don’t already have access to one and you want to purchase one, I recommend this inexpensive one from Harbor Freight. This is what I have and it works great. Once again, Harbor Freight saves the day. If you don’t have some place to secure your bench grinder, try attaching a piece of 3/4” plywood to the base of your bench grinder and then clamp that in a Workmate as seen in the video below.- Crescent wrench or similar to tighten the bench grinder’s spindle nut.
- Files: a decent fine grain metal file should work fine. You may find that bigger wheel imperfections take too long to remove with a fine file and you may want to also have a medium or coarse file on hand. Always finish your resurfacing with a fine file to make sure the wheel is smooth and soft.
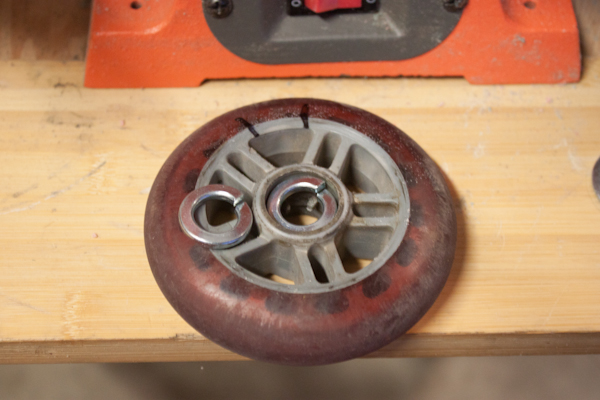
- 4 x lock washers 1/2” ID (inner diameter) to fit over the grinder’s spindle and 7/8” OD (outer diameter) to fit inside the wheel’s bearing space. Take your wheel with you to make sure they will fit when you buy them. You can find any 1/2” bolt at the hardware store to compare the inner diameter of the spindle so you don’t have to haul the grinder with you.
- 2 x fender washers 1/2” ID to fit over the spindle up against the wheel. The OD is less important, but it should be at least 1 1/4” and smaller than the full size of the wheel.
- Quality mechanic’s gloves or heavy leather gloves to protect your hands.
- Safety glasses to protect your eyes.
How To
Now that you have everything you need, let’s begin the process. These steps are also outlined in the video below. This assumes that you already have your bench grinder mounted, plugged in, and you are familiar with operating it.
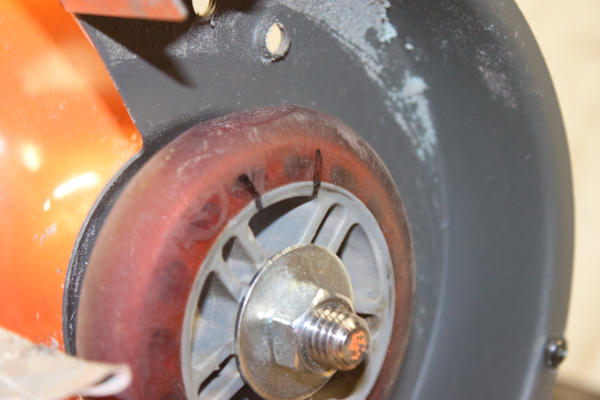
Place 2 lock washers inside each side of the wheel’s bearing space as though they were bearings.- Place 1 fender washer on the grinder’s spindle.
- Slide the wheel with lock washers on to the spindle.

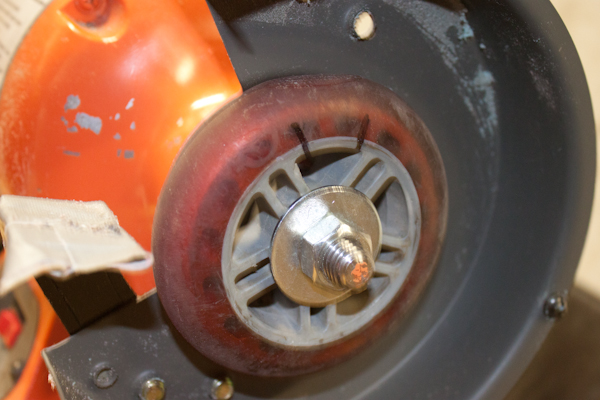
Slide the other fender washer over the spindle.- Thread the spindle nut on to the spindle and tighten. If you have slack space between the threads and the last fender washer, add more fender washers to take up the space. You should now have the following on your grinder’s spindle from inside to outside: fender washer, 2 lock washers, wheel, 2 lock washers, fender washer, spindle nut.
- Make sure that everything is tight and secure. If you haven’t already, put on your gloves and safety glasses BEFORE turning on the grinder.
- Once the grinder is up to speed and you’ve ensured that the wheel is spinning with minimal wobble (a tiny bit of wobble is okay as the lock washers aren’t a perfect replacement for bearings), you can begin using your file on the wheel. Hold the file horizontally in both hands like you’re eating corn on the cob. Make sure that you are holding it form the top with your fingers pointed down. If the spinning wheel grabs a hold of the file, you want it to rip the file out of your hands, toward the ground, rather than pulling your hands down into the grinder.
-
Work the file just above what would be the wheel’s equator as it’s spinning. Hold the file tipped slightly away from you, but not tipped so much that the upper edge catches on the spinning wheel. Don’t use too much pressure or you will bring the grinder to a halt from friction, possibly burning up the motor or injuring yourself. Gently apply light pressure to the wheel with the file.
You will feel and hear the file stutter as it goes over the flat spot. As the rest of the wheel is worn down from the file, the stutter will decrease and eventually go away as the deepest part of the flat surface is now even with the rest of the wheel.
Also, don’t be surprised if the file gets hot in your hands even with gloves. Take breaks to let the file cool, if necessary, and/or reduce pressure to allow for cooling. This is caused by the friction of the wheel spinning against the file.
- You can periodically stop the grinder to check the state of the flat spot and other imperfections in the wheel. If you do stop the grinder, let it slow down on it’s own. Do not try to stop the wheel with your hand or any other tool as the grinder is spinning down.
- Once you have removed enough material to smooth out the wheel, be sure to work the shoulders (edges) of the wheel to ensure a proper wheel profile. Compare this wheel to another wheel for the proper profile if you are not familiar with it.
If you’re happy with the new surface on your wheel, you’re done! Unplug your grinder, remove the spindle nut, remove your wheel and washers (save these for next time), and go ride on your newly resurfaced wheel!

Once again, please take extreme caution when using you bench grinder. This is now how this tool was intended to be used and you can very easily let the grinder grab a hold of the file and pull our hands into the spinning wheel. Be very, very careful.
You should be able to resurface a wheel at least once to remove most damage. Remember that you are reducing the outer diameter of the wheel when you resurface it, so your wheel will lose some speed. Always check the integrity of the urethane after resurfacing a wheel to make sure that the density of the wheel has not been compromised.
Parent’s warning: as with most scooter maintenance, if you learn how to do this, you’ll quickly become the go-to guy or gal when the kids in your neighborhood have wheel damage. It might not be a bad idea to charge $5 for this service so you can reimburse the cost of your bench grinder! ;o)