This article originally appeared on ScooterDad.com and has been reposted here for posterity.
The best way to improve your current brake, if it’s not already a Phoenix Switchblade, is to replace it with a Switchblade.
Scooter riders are always trying to figure out how to dial their scooters. Unfortunately, spring brakes have been a big problem in this area for many years. No matter what you do to them, they almost always rattle to a certain degree. The best thing you can do to solve this problem is to replace the brake with a flex fender style brake. I recommend the Phoenix Switchblade brake as it is extremely high quality, inexpensive, and made of spring steel for long-lasting performance. In addition to cutting down on the rattle, this style of brake will also make it more difficult to lock up your rear wheel so it offers some protection against flat spots.
Unfortunately, most decks are not built for a Phoenix Switchblade, but the process isn’t too difficult. If you aren’t comfortable using power tools or being precise with alignments, ask a parent or older friend to help you out.
As always, use T-handle allen key wrenches rather than L-shaped allen keys. You can buy a full set of T-handle metric allen keys for less than $10 at Harbor Freight and I highly recommend that you do so.
Safety Note
Always be careful using power tools. Drills and bits can be dangerous, especially when working with metal.
WARNING
The following instructions describe a potentially dangerous procedure and should not be performed by children or anyone not comfortable with tools. If you are a kid, have a parent do this for you. Improper use of tools could result in severe injury. Always follow tool instructions and wear safety equipment.
Please read all of these instructions and watch the video before attempting this technique.
What You Need
In order to install your Phoenix Switchblade brake using this method, you’ll need a few things:
- Phoenix Switchblade brake with all parts included (rubber washer, 2 bolts, 2 metal washers, 2 nylock nuts)
- 3mm allen key (T-handle recommended)
- 5/16” combination wrench
- Drill - corded or cordless
- 7/64” drill bit for pilot hole
- 13/64” drill bit for main hole
- 5/16” drill bit for countersink (or countersink bit)
- Hammer
- Center punch
- Box knife
- Masking tape
- Sharpie (or similar marker)
- Scissors
How To
Here’s how you can expand your clamp using the penny trick, also shown in the video below:
- First, remove your rear axle and wheel.
- Remove your old brake.
- Test fit your Switchblade brake to make sure that it will fit inside the center channel of your scooter. Some decks have rounded internal extrusion corners and you might need to bend the vertical struts on the brake inward so the brake slides in easily.
- Turn your brake upside down and place it on top of your deck to find the placement for the bolt holes. Use the sharpie to mark on your grip tape where the bolts will go.
- Using a box knife, cut a notch out of the rear of your grip tape to expose the raw deck for drilling. Your notch should be slightly larger than the bolt heads.
- Repeat the same process in step #4 to mark where the bolt holes will go on the raw surface of the deck now that you’ve removed the notch of grip tape.
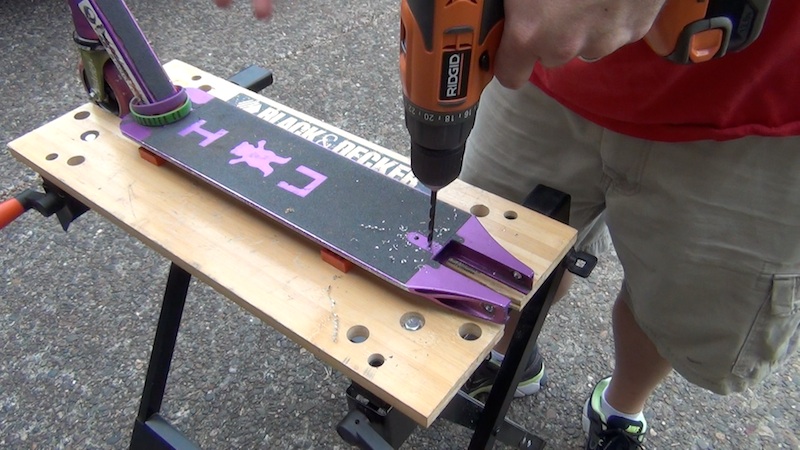
- Place a center punch over the marks and strike it carefully with a hammer to create an indent where each bolt hole will be drilled. DO NOT SKIP THIS STEP. If you do not make these indentations, you will have a difficult time keeping your drill bit centered over the marks on your deck while drilling.
- Install the 7/64” bit into your drill and drill pilot holes through the top of your deck into the indentations previously marked.
- Now that you have pilot holes drilled, install the 13/64” bit into your drill and drill out the rest of the bolt holes. The pilot holes should have made this step fairly easy.
- USE EXTREME CAUTION, OPTIONAL STEP: Using the 5/16” bit in your drill, CAREFULLY make a small countersink in your holes. You want to let your bit’s head take about 1/16” or so of the top of the deck so that there is a slight bevel to the hole. This will help your bolts sit down into the deck. IF YOU ARE NOT CAREFUL, YOU COULD DAMAGE YOUR DECK TO THE POINT WHERE YOU CANNOT INSTALL A SWITCHBLADE BRAKE. If you don’t feel comfortable doing this step, feel free to skip it. Without the countersink, your bolts will just stick up a little bit more.
- Now that you have the holes drilled in the deck, it’s time to prepare the brake. Set aside the rubber washer for this step and the next, but assemble the rest of the brake: put the bolts through the top of the brake and install the washers and nuts on the bottom on to the bolts. Just barely thread the nuts on to the bolts, just a couple of threads, not even into the nylon. We’re going to remove them in the next step.
- Turn your brake upside down so that the bolts fall toward the ground. Your bottom side of your brake should now have the washers and nuts resting on the brake due to gravity. Take a small piece of masking tape and put it over the nuts so that it tapes the nuts and washers to the underside of the brake. Really work the tape in so that it’s securely fastening the nuts to the brake. If you don’t get this step right, you’ll have to repeat it, which can be frustrating. Now carefully remove the bolts without breaking the tape loose. If the tape doesn’t hold the nuts, you threaded the nuts too far on to the bolts.
- Using scissors, cut about 1/4” of the rubber washer off on one side in a straight line. This is the edge that will go toward the front bolt on the brake.
- Place the rubber washer on top of the brake and align the washer with the rear hole on top brake and slip the brake and washer into the deck. Make sure that the rear holes are all aligned from top to bottom: rear hole in deck, hole in rubber washer, rear hole in brake.
- Carefully thread the bolts through the deck, brake, washers, and into the nuts. Just get the bolts started into the threads. If the tape brakes loose during this process before the bolts are threaded, you’ll have to start over with step #11.
- Once your bolts are started into the threads of the nuts, you can now use the 3mm allen T-handle and 5/16” combination wrench (inside the deck on the bolts) to tighten the brake bolts. Note: some decks are more difficult to work on depending on the space on the underside of the deck.
- You can remove the tape if you want, or you can leave it in. The tape won’t hurt anything and it’s sometimes difficult to remove.
- Re-install your rear wheel and axle, then go ride and enjoy a rattle-free, dialed scoot!
Can’t catch a brake?
If you’re having a difficult time with this installation, don’t worry. It took me several installs before I got this process down smoothly. If you’re a kid, be sure to ask an adult for help. You can also see if someone you know has already done this job and ask them to lend a hand.
Good luck and have fun!