This article originally appeared on ScooterDad.com and has been reposted here for posterity.
Installing an SCS clamp system isn’t as scary as it seems.
Installing a Standard Compression System (SCS) clamp can be tricky if no one has shown you how to do it right. Even after you get your SCS installed, it can be challenging to get it locked down just right. When dealing with an SCS, the first and most important precaution you should keep in mind is to not let anyone that you don’t trust mess with it. Often times, someone might be trying to help when they think they know what they are doing and they might accidentally wreck your $80 clamp. I don’t let anyone else work on my kid’s scooters not because I don’t trust them, but because if I screw it up, then I have to pay for it. If someone else breaks a part, I don’t want to deal with that awkward interaction of who has to pay for it.
Clamps, and SCS clamps especially, seem to be the biggest culprits of breakage when someone is trying to help you out. It takes a delicate touch to know how much pressure is too much pressure when dealing with steel bolts in aluminum threads. It also takes a bit of finesse to get the clamp tightened evenly without binding. Watch other people when working on their SCS and go slowly. Most problems occur when people try to rush the process.
As always, use T-handle allen key wrenches rather than L-shaped allen keys. You can buy a full set of T-handle metric allen keys for less than $10 at Harbor Freight and I highly recommend that you do so.
Safety Note
Be careful not to pinch your fingers in the clamp throughout the process listed below.
WARNING
The following instructions describe a potentially dangerous procedure and should not be performed by children or anyone not comfortable with tools. If you are a kid, have a parent do this for you. Improper use of tools could result in severe injury. Always follow tool instructions and wear safety equipment.
Please read all of these instructions and watch the video before attempting this technique.
What You Need
In order to install your SCS clamp using this method, you’ll need a few things:
- Bars WITHOUT a slit and cut to the proper height. Remember that an SCS clamp adds about 2 inches of height, so you probably need to cut off an extra 2 inches from your bars. This will allow you to cut off an existing slit in your bars as well.
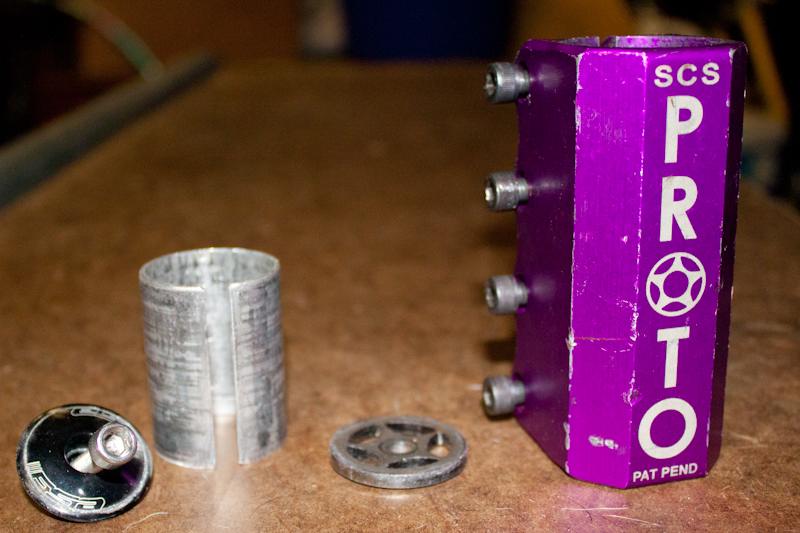
- Proto SCS, including 4 clamp bolts, 1 compression bolt, 1 compression cap (looks like a thick washer with a star shape in the middle), and a bar shim. While most SCS systems should work similar to this, I don’t have experience with other systems to outline the subtle differences.
- Fork with startnut installed or a fork with threads built in, such as a Phoenix Phorx.
- Deck with threadless headset installed.
- Machine grease such as Bel-Ray Waterproof Grease.
- T-handle allen key wrenches of various size, such as these: http://www.harborfreight.com/10-piece-t-handle-metric-hex-key-set-37862.html
- [Optional for step 4-B below] Headset top cap.
How To
Here’s how you can expand your clamp using the penny trick, also shown in the video below:
- Remove any bolts from your SCS clamp and expand the clamp slightly using the penny trick.
- Place the compression cap inside the top of your clamp so that it rests inside and on top of the ledge formed by the narrower opening at the bottom of the clamp. It should rest about half-way down the inside of the clamp.
- If you are using standard size bars (1-1/4 inch outer diameter), then install the bar shim into the top of your clamp. Make sure that the slit of the bar shim and the clamp are properly aligned together. If you are using oversized bars (1-3/8 inch outer diameter), then you can disregard the bar shim.
- Follow one of these steps, depending on your preference:
- Place the compression bolt through the center of the compression cap inside the SCS clamp.
-
As shown in the video below, place the compression bolt through the center of your a headset top cap (this would have come with your threadless headset), then place this assembly inside your SCS clamp, feeding the bolt through the center of the compression cap.
The reason why I chose to use the headset top cap in addition to the compression cap is because I’ve encountered issues with the compression cap bending under pressure from the compression bolt. While I’m not sure if it makes a difference, I feel better having the pressure of the compression bolt spread out over the compression cap via the headset top cap.
This step doesn’t affect the fit of your bars, although you may need to use a longer compression bolt if you are using a fork with a starnut that has been set fairly deep.
- Begin to thread the compression bolt into the threads on your fork (or starnut), but don’t fully tighten this yet.
- Straighten your clamp in relation to your fork and then carefully tighten your compression bolt. You don’t want to tighten this too much your your headset won’t spin. Conversely, you don’t want it too loose or your headset will be sloppy. Try to find a happy medium and remember that this is how you adjust your headset compression (tension) if you need to change it later.
- Drop your bars into the top of your clamp and roughly straighten them. If you haven’t removed your penny yet, go ahead and do this now.
-
Apply a small amount of machine grease to the threads of each of your clamp bolts and thread them into your clamp. Don’t tighten them yet, just get them barely started into the clamp.
This step is very important to help prevent your bolts from binding in your clamp. Since the bolts are steel and the clamp is much softer aluminum, your bolts can easily destroy the threads in your clamp. While you can purchase a kit from Inward Scooters to repair your clamp, it’s much easier to just be careful and take care of your clamp. I’ve maintained 4 SCS clamps without stripping any of them by simply being careful. I didn’t even learn the grease trick until just recently, but it makes a big difference so be sure to use a quality grease. Do not use something like Vaseline or chapstick or cheese whiz or a melted Snickers bar. Use a good quality machine grease.
-
Check the alignment of your fork, clamp, and bars once again and begin to tighten each bolt a little at a time. DO NOT tighten one bolt all the way as it will cause your clamp to bind and prevent the other bolts from being tightened. Tighten a bolt a little bit, then move to the next one, and so on until you’ve tightened all 4 bolts a small amount, then start over and repeat. Keep doing this until you’ve worked all the bolts in evenly and tightened your clamp.
It will take some time to learn how much pressure the aluminum clamp threads can take before they are damaged, so err on the side of not-tight-enough rather than over-tightening them. You can always go back and tighten the bolts more if your bars are slipping, but once you damage your clamp, you’re out $80 for a new one.
If you find that your clamp is slipping on the fork, do your final tightening on the bottom two bolts before the top two. If you find that your clamp is slipping on the bars, do your final tightening on the top two bolts before the bottom two. I don’t mean “tighten the top two bolts all the way, then tighten the bottom two”, but rather I mean that you should follow the process of tightening each bolt a little at a time as explained above, but then do the last quarter- to half-turn tightening on the top two or bottom two before the others.
- Check your alignment, compression, and clamp tightness. If you have to make an adjustment, follow the same procedure to loosen the bolts: each bolt a little at a time. If you experience binding, the bolts will seize and you might hear a pop or smell a hot metallic odor as the steel bolts are building up friction against the aluminum threads. This means that you have rushed one bolt before the others. Try to determine which bolt is out too far, turn it back in a little bit, and try to even out the bolts. The grease on your bolts should help ease some of the friction caused by binding.
Love It or Leave It
You might hear people bashing on the SCS clamp from time to time. The truth is, it’s heavy and some people have a hard time getting it adjusted just right. While the criticism of the weight is accurate, it’s affects are reduced do to the fact that its weight is near the center of rotational mass on your scooter. Criticisms related to problems with adjustments, however, are simply related to part incompatibility (such as the aluminum District bars I use in the video as an example of oversized bars) or a lack of understanding of how the SCS system works. After spending some time working with our SCS systems, I’ve been able to use them successfully on our scooters, although we have recently moved to HIC systems, which I’ll cover in another article and video soon.
Good luck and have fun!