This article originally appeared on ScooterDad.com and has been reposted here for posterity.
HIC stands for Hidden Internal Compression
It seems that Hidden Internal Compression (HIC) systems are becoming more and more popular among freestyle scooter riders. This is because they are simple, cheap, and light compared to SCS systems, which we covered in another tutorial found here: Proto SCS Installation.
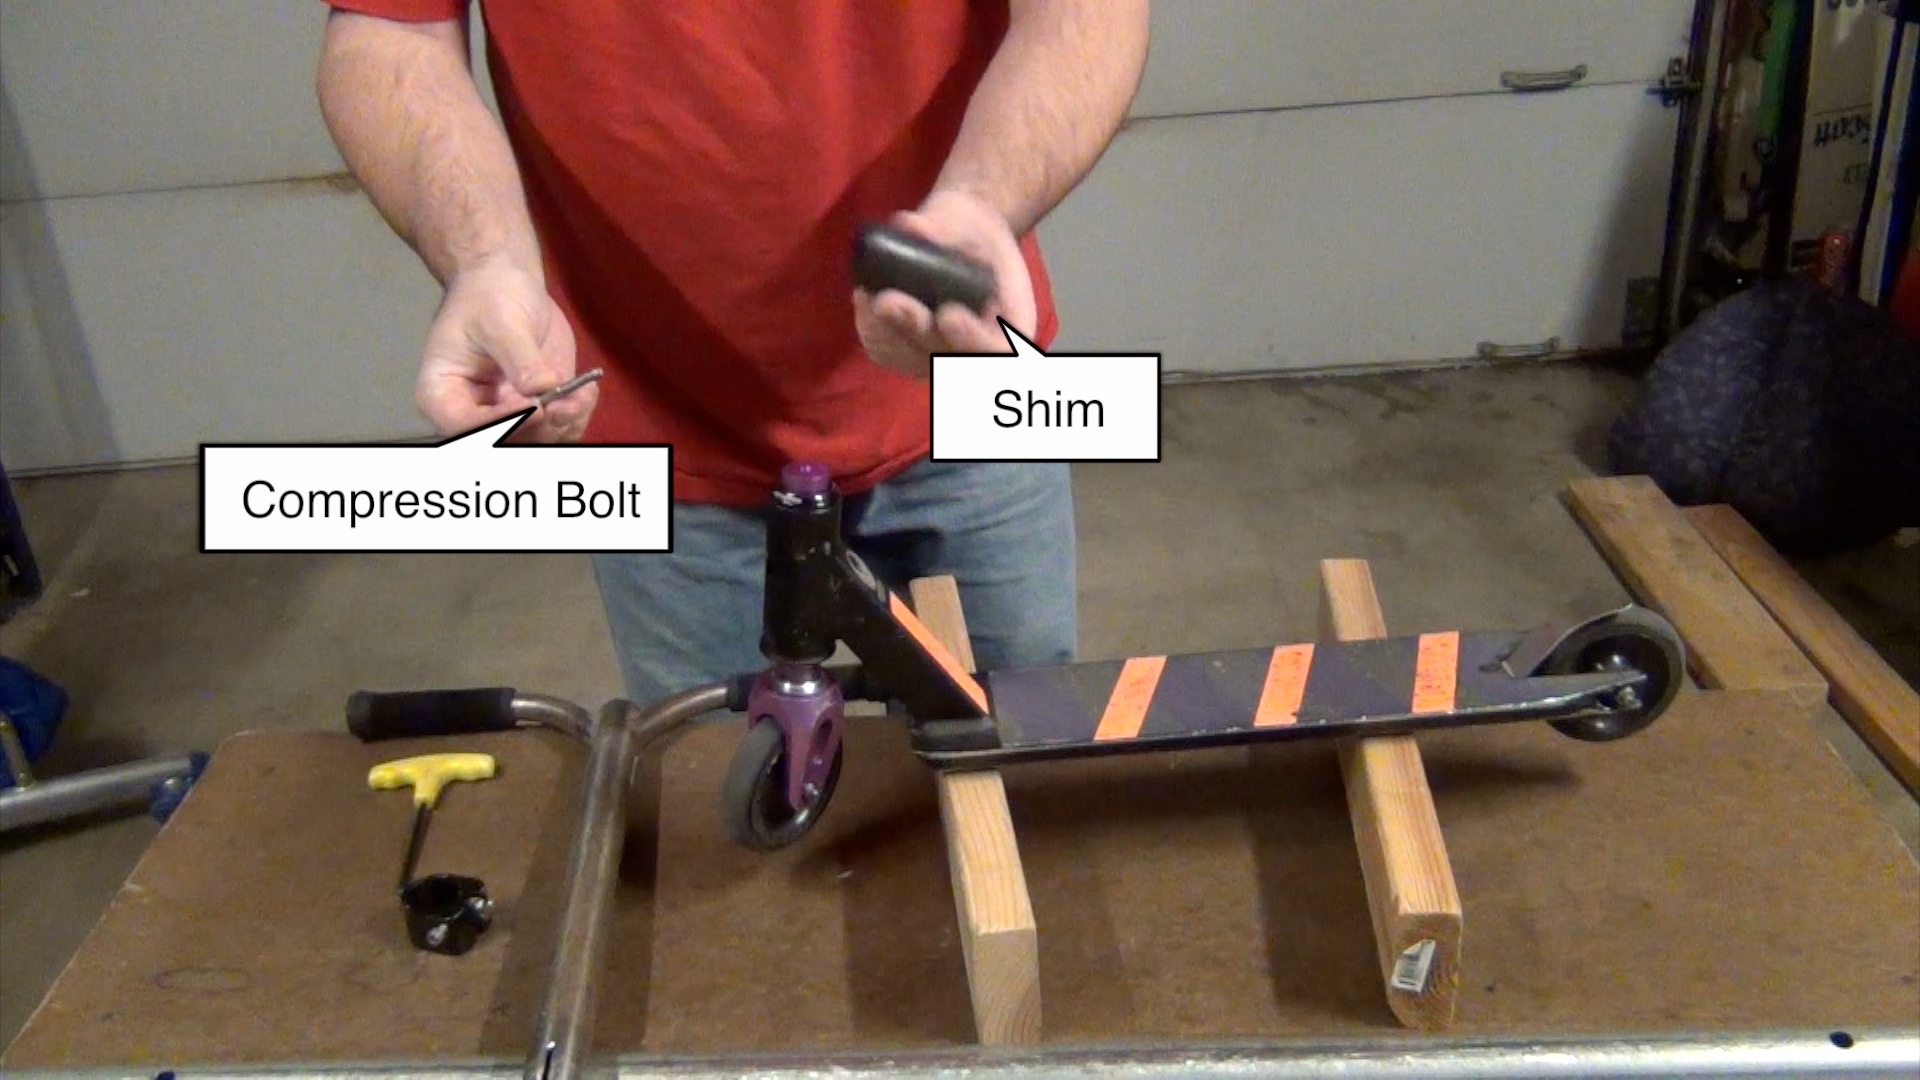
The HIC system uses a shim to extend the reach of the fork into the bars and prevent the fork from pulling out of the headtube. The tutorial video in this article uses a Lucky HIC composite shim, Lucky HIC bars, and Lucky HIC oversized clamp, but other HIC systems should work similarly. In terms of true HIC, we’ve been extremely happy with the Lucky setup.
As I mentioned in our SCS installation tutorial, be cautious with who you let work on your clamp and compression system. These systems are far from bulletproof and you don’t want someone wrecking your setup if they don’t know what they are doing.
As always, use T-handle allen key wrenches rather than L-shaped allen keys. You can buy a full set of T-handle metric allen keys for less than $10 at Harbor Freight and I highly recommend that you do so.
Safety Note
Be careful not to pinch your fingers in the clamp throughout the process listed below.
WARNING
The following instructions describe a potentially dangerous procedure and should not be performed by children or anyone not comfortable with tools. If you are a kid, have a parent do this for you. Improper use of tools could result in severe injury. Always follow tool instructions and wear safety equipment.
Please read all of these instructions and watch the video before attempting this technique.
What You Need
In order to install your HIC system using this method, you’ll need a few things:
- Oversized bars (1-3/8 inch outer diameter) WITH a slit and cut to the proper height. Your bars MUST have a slit cut in them to allow for the clamp to properly compress your bars on to the shim. Some aluminum oversized bars may have a tube wall thickness that prevents it from working with an HIC shim. District aluminum bars are an example of such bars that will not work with HIC.
- HIC shim and compression bolt. Most HIC systems should work similar to the Lucky HIC system we are using in this tutorial.
- Oversized (1-3/8 inch inner diameter) clamp and its accompanying bolts.
- Fork with startnut installed or a fork with threads built in, such as a Phoenix Phorx.
- Deck with threadless headset installed.
- T-handle allen key wrenches of various size, such as these: http://www.harborfreight.com/10-piece-t-handle-metric-hex-key-set-37862.html
- [Optional for step 1 below] Compression cap.
How To
Here’s how you can expand your clamp using the penny trick, also shown in the video below:
- Slip your compression bolt through the top (closed end) of your HIC shim. If you’re using an HIC shim that doesn’t have a closed end, such as a TSI HIC shim, you’ll need to use a standard compression cap that came with your threadless headset. Run your compression bolt through the compression cap and then place the cap on the end of the shim.
- Make sure that your fork is positioned correctly in your headtube so that the fork’s race is seated properly against the lower headset bearing and then lower the HIC shim, including bolt (and cap if you’re using one), on to the fork. Carefully thread your compression bolt into the threads in your fork.
- Gently tighten your compression bolt until your headset is snug, but not too tight. You don’t want to tighten this too much your your headset won’t spin. Conversely, you don’t want it too loose or your headset will be sloppy. Try to find a happy medium and remember that this is how you adjust your headset compression (tension) if you need to change it later. You will likely need to tighten this bolt again as your headset continues to seat completely and break in over time.
- Now it’s time to install your bars and clamp. Remove any bolts from your oversized (HIC) clamp and expand the clamp slightly using the penny trick. If you can easily slip your clamp on to your bars and your bars, you can probably skip the penny trick step.
- Make sure that the slit in your clamp is aligned with the slit in your bars as you slip your clamp on to your bars. The bottom of the clamp should be flush with the bottom of your bars.
- Place your bars, with clamp, on to your shim so that your clamp and bars seat all the way down to the headset or the bottom of your shim if it has a lip like the Lucky and Phoenix shims.
- At this point, if you haven’t already, you can remove your penny and reinstall your clamp bolts loosely. Align your bars and carefully tighten your clamp bolts alternately a little at a time to prevent binding and stripping. Your bolts should be tight, but not so tight that you risk stripping out the heads on your bolts or stripping the threads in your clamp.
Got the HIC-ups?
If you have any issues with getting your HIC system to lock down without slipping, you’re not alone. I ran into this problem early on while dealing with HIC systems. Moving to the Lucky HIC composite shim really made a big difference. Similarly, the Phoenix TLC system, which is a lot like HIC, hasn’t given us any slippage problems either.
If you’re stuck with the shim you’ve got and it’s still not locking down, you can try cleaning your shim, your clamp, and your bars, inside and out, to remove any grease, dirt, or oil that may cause your system to not grip tightly. Sometimes you’ll run into a slight variance in material tolerances that will prevent your clamp from compressing your bars enough. In this case, you can try cutting a small shim out of a pop can to fit between your clamp and bars. This added thickness can help the clamp compression.
That should do it! You’re ready to ride. Good luck and have fun!